


Building your own web app can bring many benefits. For instance, you can save tons of money by leveraging a no-code app-building platform and building your web app yourself.
Unfortunately, getting the ball rolling is difficult because there are loads of no-code web app-building platforms out there. When you finally choose a platform that works, breathing life into your web app takes planning, time, and patience.
But don’t despair — we have a battle-tested system that you can follow to create the perfect web app for your exact needs. In this article, we’ll walk you through how to build a no-code web app with ease.

Getting Started with No-Code Development
Today, you don’t need any coding or technical expertise to create a web app. No-code tech makes this possible: Building a web app is nearly the same as building a PowerPoint presentation, as both platforms feature intuitive drag-and-drop interfaces.
Point and click on functionalities in a building interface, and they’ll appear on your building canvas. Adjust their size using your free-form cursor or your building dashboard. You can also add your own custom images by dragging them over to your building canvas.
Today, there are dozens of no-code web app builders, but one stands above the rest: Adalo. Adalo is one of the most easy-to-use yet powerful web app builders on the market. It’s so simple that you can start building your app immediately after signing up.
However, Adalo doesn’t sacrifice power for ease of use. When you sign up with Adalo, you’ll get several supercharged functionalities, including:
- Over 35 preloaded templates to choose from. They’ve got everything you need, including screens and a database, to start your building right. You’ll be able to customize everything to your exact needs and tastes.
- Powerful integrations to popular third-party applications like Stripe, QuickBooks, and Zapier, just to name a few. These integrations let you gather data to add more power to your app.
- A thriving ecosystem that’s been growing since Adalo launched in 2018. You’ll find tutorials, developer-made plugins to give your app some juice, help documentation, and a forum for connecting with other Adalo users.
- The ability to publish to the Apple App Store and Google Play Store. In addition to releasing your app to the web, Adalo allows you to publish your app to the app store.
You won’t have to worry about making major adjustments to your app: Adalo’s software allows you to publish nearly the same version of your app on the web and in the app stores.
One of the best parts about signing up for Adalo is that it offers an extremely generous free version. This version allows you to build your web app and publish it to the web for immediate access.
Web Apps 101: Essential You Should Know
Let’s go over some web app basics before we jump into building a no-code web app. First, there are two kinds of web apps:
- Web Apps: These are interactive websites you can access with any browser. Examples include Facebook, online banking, and Zillow. You’ll often be required to sign in, but at other times, you can still access features without having an account.
- Progressive Web Apps (PWAs): You’ll need a link or a QR code to access these apps, which can be downloaded directly to your phone. PWAs that you download to your phone can be quite powerful, as they might be able to harness your phone's processors, hardware, and components like your camera and GPS.
However, PWAs cannot be easily published in the Apple App Store or Google Play Store, so they aren’t to be confused with native mobile apps.
For the sake of simplicity, I’ll refer to both web apps and PWAs as web apps or just “apps.”
The Anatomy of an App
All apps, both web apps and native mobile apps, have three main parts:
- The Frontend: This is the part of your app that people will read, tap on, and interact with; it’s also called the user interface (UI). Your UI comprises all your screens, pictures, buttons, forms: Anything users see.
- The Backend: Think of the backend as your app’s command center, executing tasks and ensuring your app runs like a well-oiled machine. The backend fetches info that users request, allows users to log in, connects with third-party apps, and adds data to the database.
- The Database: The database is your app’s storage center and takes the form of a spreadsheet. All your app’s information will be stored here. Examples of info stored in a database include user profile data, the goods sold in your e-commerce store, and more.
Conveniently, Adalo provides you with each of these three components before you start building your app, so you won’t have to build them from scratch. This saves you time while helping you learn by intuition.
For instance, you’ll already have a pre-made database to see how all the data is organized. All you need to do is add your own data.
Creating Your Web App: A Step-by-Step Process
Step 1: Choose a Starting Template
Adalo has over 35 pre-made templates, which have everything you need to start building your app. No matter what type of app you want to build, Adalo’s got a template to get you started. Here are just a few choices:
- A Notion-inspired template for your written content.
- 3 different styles of e-commerce templates for your online store.
- An ordering template for your restaurant, cafe, or food truck.
- An appointment template for your hair or beauty salon.
- A real estate app for your rentals or properties you wish to sell.
While all the templates include everything you need, you can also add new screens if you want.
Step 2: Customize Your Data Model
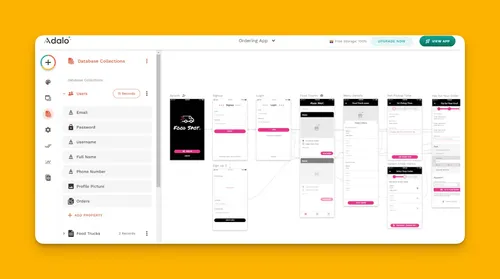
Now that you’ve selected your template, let’s build your database. Accessing this is simple in Adalo: On the left-hand drop-down editor of your building interface, hover your mouse over the icon that looks like a spreadsheet. The word “Database” will appear. Click on this.
You’ll see all your template’s database collections, which are individual parts of your database. Structured like spreadsheets, database collections contain all your app’s info. When you click on a collection, you’ll see all the database properties or individual pieces of information in that collection.
Adding new collections and properties is a breeze. If you want to keep pre-existing collections but prefer to add your own properties, just scroll to “Add Properties” and enter the info you want. You can add collections by scrolling to the “Add Collections” button.
Step 3: Personalize Your Design
It’s time to customize your front end to meet your brand and preferences. At the very top of the left-hand drop-down dashboard, you’ll see a “+” inside a colorful circle. Click on this to add new buttons, shapes, and images to your app.
You’ll also be able to drag images and other elements to your desired screen directly from your desktop. After you’ve added an image or logo to your screen, you’ll be able to customize the size, color, transparency, and more by simply clicking on it.
To change a screen’s color scheme and fonts, find the button that appears like an artist’s palette near the top of the left-hand drop-down dashboard. When you hover your mouse over it, the word “Branding” will appear. Click on this to tailor your app’s visual elements, colors, logos, and layout to reflect your brand.
Step 4: Add Functional Pages
If you need to add more pages to your app, press that colorful button at the very top of the left-hand drop-down dashboard. You’ll immediately see several different types of screens that you can tack onto your app.
Alternatively, you can add new screens by pressing the “Screens” button on the left-hand drop-down dashboard.
You’ll also be able to drag over forms, which are elements that users will fill out and submit when they order food, place a booking at your spa, sign up to your social network, and more.
Click on each screen on your building canvas (center of the app-building interface) and customize each functional page, form, and element to your liking.
Step 5: Set Up User Navigation
Adalo’s building canvas intuitively displays how each screen and element connects with other parts of your app by showing arrows that connect a button or element to the screen it opens.
Your preloaded template comes with pre packed connectivity. For instance, a “sign up button” will open a screen containing a form that lets users fill in the info needed to join your social network on Adalo’s social network template.
Creating your own navigation between elements and screens is simple. Just click on the element you want, like a form or button. Then, on the left-hand drop-down dashboard, scroll to “Click Actions” and select “Add Another Action,” then click “Link.” Connect the element to the screen you wish.
Step 6: Test Your Application
After you’ve put the finishing touches on your web app, it’s time to test it. Adalo makes testing your no-code web app simple: At the top right-hand side of your building interface, click the green button titled “View App.”
You can view your app as if it were live by picking the “Staging Preview” button. Click through each screen and try every feature to ensure your app works.
It's also a good idea to get other eyes on your app. Adalo lets you share your app before publishing it to the web — just select the “Share Your App” option after clicking the “Staging Preview” button. You can also send a link via SMS to friends, family, and clients.
Adalo will provide you with a QR code that links to your app. You can share it on your social media or send it to people via DM.
Always get feedback from the people who’ve tested your app. Make sure you take their advice into account. Remember, the better your app’s user experience, the more users you’ll get.
Step 7: Implement Payment Processing
If you want to take payments, you’ll love Adalo’s integration with Stripe, a commonly used payment platform. Generously, Adalo also lets you integrate with Stripe even when you build your web app with its free version.
To integrate Stripe with your app, create a Stripe account. Then, return to Adalo, press the “Add Components” button, and find the Stripe form. Click on it, enter all your info, drag it to your payment screen, and get paid!
Step 8: Launch Your App
Now that you’ve incorporated all your user feedback and tied up all the loose ends, it’s time to publish your web app. You’ll be able to publish your app as both a web app and a PWA without making any changes. Here’s how:
- Publishing a PWA: Click the “Publishing” button on your editing dashboard, then choose “Progressive Web App.” After following the directions, you’ll receive a link to your PWA. Share this to your social media accounts, and paste a link on your website so users can download your PWA with ease.
- Publishing a web app: In the top right corner of your app, push your profile button and then click on “Settings.” Scroll down to “Domain,” and enter your custom web address here. Then, return to your editing dashboard, click the “Publish” button, and your app is now live.
Effective Launch Strategies and Maintenance
Once you’ve launched your web app, you’ll need to get more users by promoting it. Not sure where to start? Don’t worry — here’s how to launch an effective promotional strategy. Following our guide takes consistent time and effort, but it should pay off in the long run.
You’ll also need to run daily analytics checks. Doing this will show you how many people are using your apps, which screens are the most popular, your app’s load time, and other critical details.
Importantly, you’ll need to ensure that your app always runs at optimal speeds (fast) and never crashes. Users will quickly abandon a poorly performing app. Prevent this from happening by routinely updating your app for maintenance and having a handful of users test each iteration before launching updates.
Building your very own web app with Adalo can not only help your business thrive, but it can also be a fun and rewarding experience. Enjoy your building experience!
.png)
.png)
.png)
